
--> Environment setup using ADT Bundle
--> Environment setup using Genymotion
So let's start
Environment setup using ADT Bundle
Click here to download ADT (Android Development Tools) bundle. After downloading just extract from zip.
We are going to install or configure these environment in the Linux ubuntu 14.04 Desktop OS. One more thing before going to install ADT bundle make sure you have installed java.
how you know that you have installed java in your system ?
to know about java installed just open terminal and type as shown below and you get the output as shown in the image below

If you don't have installed java then install java first and java is also necessary for installing Burp Suite also. installing java is out of our scope if you don't know how to install java then please Google for it.
unzip the ADT bundle and go to sdk > tools and launch the android

our android sdk is running now as shown in image below.

Select all tools and android 4.2.2 API and click on install package button right bottom. when you installed all the tools and android 4.2.2 API it looks like as in below image

don't worry if it upgrade from API 17 to API 19. it will update and install all the tools and APIs.
Now after installing all the tools and API we just need to create device, And for that we just need to go to Tools and click on "Manage AVD". It will open windows like as shown below

Now create new AVD and it shows screen as shown below
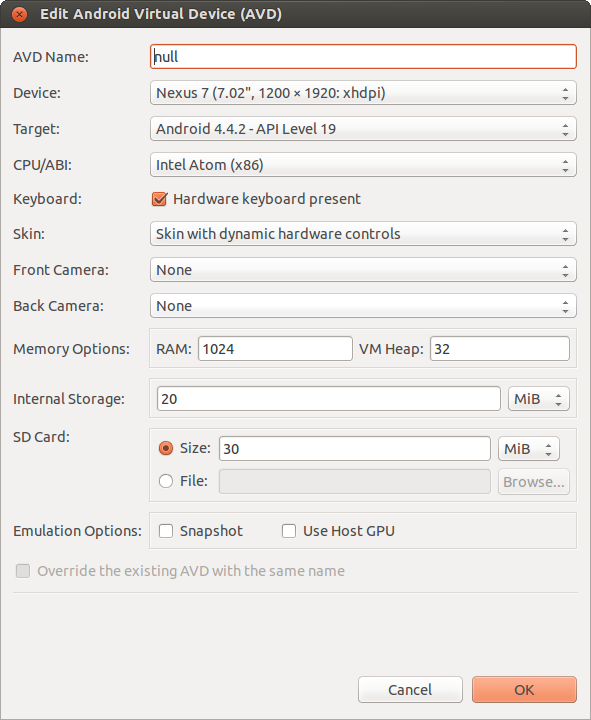
ok let me clear something for you this is regarding this AVD screen.
AVD Name --> Give name to your device you want
Device --> Select any device from the list but select according to your system configurations.
Target --> It will show you the list only for those devices we installed by using SDK Manager. if you remember we downloaded Android 4.2.2.
CPU/ABI --> Select Intel Atom for better performance
RAM --> As per your system but select more than 512 MB for better performance.
Int Storage --> just 20 MB and SD card too 20 or 30 MB enough.
click ok and your AVD Android virtual device is ready.
select your device and click on start and then launch your device your virtual device is ready

This is the front end everyone knows but we need to go deep in the other end so let's see how we can see the backend part of our emulator. Just go to your terminal and just type "adb devices"

we will study about the adb in deep in our different post for now just for getting shell we need to type "adb shell" in command as shown in the image above. in the data/data directory you can find the data for the installed applications.
Environment setup using Genymotion
Go to the official website of genymotion register and Download according to your requirement. I am using ubuntu 14.04. for ubuntu there is bin file. place it in any safe directory where you want to install.
go to the directory through terminal and give execute permission and run it.
Note: before start installing genymotion you need to install java and virtualbox. and to know how to install java and virtualbox please google it.
after downloading and installing virtualbox and java just run genymotion.

it will open genymotion as shown below.


after login it shows you the list of all available virtual devices. select device and install. i am going to install simple custom phone 4.3 - API 18 - 768x1280.
i recommended this for application testing this is affordable for my machine.

Give RAM 1 GB to this virtual device click ok and save the configurations.


now after all the setup click on start button our virtual device is ready to start.

now to see adb devices go to command line and move in tools folder.

In the image above you can clearly observed we are running 192.168.56.101 device on port no. 5555.
to get the shell just type ./adb shell

we will discusses about this adb tool in details later.


0 comments